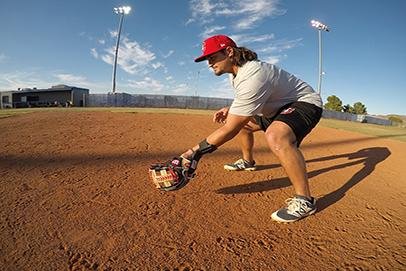
These 12 Essential & Fun Baseball Drills for Beginners are a MUST HAVE for every tee ball and Little League coach. Make these drills a regular part of your practice plans and routines, and your players FIELDING, THROWING and HITTING skills are sure to improve.
These are also great drills for moms and dads to work with their kids at home. They’re SIMPLE and FUN, and your player will enjoy working on them with you.
Beginner Fielding Drills
Bean Bag or Frisbee Toss
Purpose: This drill is to improve a player’s glove hand skills and help them get better at catching a baseball.
Set up: You will need to have bean bags or small frisbees for this drill. If you don’t have any at home, click on the pictures below to pick them up. These are both soft, but durable products that are perfect for kids. Both tools force players to pinch their fingers and thumbs together like they will be doing with a baseball glove.
Drill can be done with player and coach or as a partner drill between to players. Players will stand about 15 feet apart, facing each other. They will not have their baseball gloves. Each pair of players will have one bean bag or frisbee.
How it works: The goal of this drill is to train the glove hand and arm to work correctly. The players should not move their feet to get the bag or frisbee, they will only be reaching with their arm and hand. Players will be tossing the bean bags underhand or flipping the frisbee softly, with the goal of giving their partner a toss that is catchable. The receiving player will be in a ready stance with their glove hand (non-dominant hand) up and ready to receive. When the bag or frisbee is tossed, the receiver must only use his glove hand to catch it. They are not allowed to use two hands or their throwing hand (dominant hand).
Progression tip: Once players get good at this drill, make it more difficult. You can make it a competition to see which group can get the most catches in a row. Another competition idea would be to set a time, and see which group can get the highest number of clean catches in the set amount of time.
Through the Wickets Drill
Purpose: This drill is to help young players begin to understand the importance of being quick on their feet, moving to go get ground balls, and getting their body in front of the ball.
Set up: Coach will have a bucket of baseballs and be about 25 feet away from player. Drill can be done inside or outside. If outside, it will work better on infield dirt than it will on grass. Player will be in an athletic stance facing the coach. Player does not need a glove.
How it works: The coach will begin rolling ground balls by hand at a medium speed. He will alternate rolling the balls to the players left and right, forcing the player to move several steps to get to the ball. The player’s goal is to move his body into position so that each ball rolls between his feet and through his legs. The speed should be fast enough to force the player to move quickly, but not too fast for the player to get to. Each ball should roll past the player and out of his way. The coach should not bounce the ball, it must be rolling the entire time. The coach will roll 4-6 ground balls in a row, then give the player a break or rotate to the next player.
Goalie Drill
Purpose: This drill is to get players comfortable and confident in getting in front and keeping their body squared up to the ball.
Set up: This drill is designed for use with TENNIS BALLS. It must be performed on a surface that allows the ball to bounce. Player will set up about 15 feet away from coach, facing him in a ready position. Player does not need a glove.
How it works: Coach will bounce the tennis balls on a one-hop at the player’s chest height, alternating moving the player left and right. The player’s goal is to use his chest to block each ball and knock them back toward the coach. The coach should bounce each ball far enough away from the player to force him to move quickly, but not too far for the player to get to. The coach should bounce 4-6 ground balls in a row, then give the player a break or rotate to the next player.
Next, the player must develop confidence in his hands so that he can stay down on the
ground ball instead of pulling his body or head up. Here are a couple drills to work on that.
Stationary Fielding Position Drill
Purpose: This drill is to help players learn the proper ground ball fielding position and to work on their hand skills when fielding a ground ball.
Set up: This can be a partner drill or a coach led drill. Partners or player and coach will set up about 10 feet away from each other. Players will be set up in a ground ball fielding position. This can be done with a glove, or it can be a bare handed drill.
How it works: Players and/or coaches will roll ground balls back and forth to each other, while remaining in the fielding position. Players should focus on fielding the ground ball with their hands in the “alligator mouth” position (throwing hand over the top of the glove hand). With their hands together, players will field, bring the ball in toward their body and directly up to their chest. They should be getting the ball up to the position near their chest that they typically throw from. Remaining in the ground ball position, they will immediately roll a ground ball back to their partner or coach. As players get better at this drill, speed it up. Players can try to get the ball into their chest and back to their partner as fast as possible. Coaches working with a player can roll balls in a rapid fire procession, having the player bring each ball to his chest, dump it off to the side, and immediately receive another ground ball.
Short Hop Drills
Purpose: This drill is to improve players infield glove skills.
Set up: Fielder will begin on his knees, with glove out in front of his body but without stiffening out his arms. His fingers should be pointing to ground, glove tip touching ground. Partner or coach will be on knees about 10 feet away.
How it works: The coach or partner will toss the ball softly so that it hops directly in front of the fielder’s glove creating a short hop. Fielder will push his glove through the ball while extending his arm and trying to keep his fingers pointed to the ground as long as possible. While doing so, the player’s eyes and head should stay on the baseball and glove. The player should try to avoid flipping their glove up and curling their wrist. Ideally, their palm will finish facing the sky.
*If your players are having trouble throwing or catching short hops during this drill, you can make it easier by having them use their throwing hand to drop their own short hops right in front of their glove. Another option is having their partner stand close and drop the ball directly in front of them.
Underhand Safety Ball Toss
Purpose: This is a simple drill to help kids learn how to catch fly balls. It helps them gain confidence catching the ball up high and in front of their body.
Set up: Use a SAFETY BALL for this drill. This can be a partner or coach led drill. Partners or coach and player will start about 15 feet apart facing each other. Players will need their gloves.
How it works: Coach or partner will flip a ball underhand into the air so that it will land close to the player. They should start out by flipping it about 8 to 10 feet in the air, and work up higher as the player begins to gain confidence. Player is trying to get and keep their body underneath the ball and catch the ball up high near their head. The player should freeze after they catch the ball, leaving their glove up where the made the catch for 2 seconds.
Beginner Throwing Drills
Target Throwing
Purpose: This drill is designed to help players develop command and control when throwing and/or pitching.
Set up: Have fun with your targets. You can create your own targets with a point system, or simply put a baseball on a tee. Use your best judgment on distance. Set the kids up far enough away that it is a challenge, but close enough that they will be able to hit the targets frequently.
How it works: Simply put, the players will be throwing the ball and trying to hit whatever target you put up. This is a simple drill and concept that can be used often during your practices. Kids love having a target to throw at and it will help them focus on what they are doing. You can make it a competition within the team.
Bonus Fun: Create a relay race. For example, set up 4 tees with plenty of room and set baseballs on them. Break up your team into 4 smaller “teams.” Make sure each team is starting the same distance from the tee. When you say to begin, the first player in each group will throw 3 baseballs at their tee. After they throw they must go get their 3 baseballs and bring them to the next player in line to throw. If they knock the ball off on the first or second throw, they can immediately go get the baseballs, set one back on the tee, and bring the others back to the next player. The team that finishes first wins.
Distance Throw
Purpose: This drill is designed to get young players to gain confidence with throwing the ball hard. Many times they will ease off throwing hard while playing catch, so that they don’t overthrow their partner. This is a great at-home drill for beginners.
Set up: Players need to have their arms fully warmed up. They should have already played catch for 10 to 15 minutes before doing this drill. This can be a competition or done individually.
How it works: Just as the name implies, players will be trying to throw the ball as far as they can. Have them begin on a foul line or set a cone up to mark where they must throw from. A coach or another player will be standing out in the field to act as a marker. The player will throw the ball as far as he can, and when it stops the marker coach will go stand where it landed. Give the player 3 attempts, and leave a cone or other type of marker on his farthest throw. The winner will be the player who’s marker is the farthest from the starting line. If done as an individual drill, have players write down where their farthest throw landed, so that they can try to top their best distance the next time you do the drill.
Beginner Hitting Drills
Fungo Drill
Purpose: This drill is great for hitters of all ages, but especially for beginners. It helps develop hand-eye coordination, balance, and body and bat control.
Set up: Player will need their bat, at least one baseball (but preferably a bucket full), and plenty of room to swing.
How it works: A fungo style hit is when you throw the ball up to yourself and hit it; just like coaches do when they hit ground balls or fly balls to their players. The player will take the ball in his bottom hand, and have the bat up and ready in his top hand. Make sure the nob (handle end) of the bat is pointed toward where a catcher would squat behind them, and not facing toward where a pitcher would be.
*Note: Young players may have difficulty flipping with their bottom hand because it is usually their non-dominant hand. If they simply cannot execute the flip, let them try with their other hand. In the long run, it’s best to teach them to flip with the bottom hand, because it requires much less movement to get the hand back to the bat.
The player will flip the ball out in front of themselves in an area that they would normally make contact with a pitched ball, and attempt to hit the ball as a line drive up the middle of the field or batting cage.
Bonus Fun: Set up some “holes” and play a round of fungo golf. For example, start at home plate and make the right field foul pole the “hole.” Each player counts how many hits it takes for them to get to the foul pole and hit it. The player who reaches the “hole” with the lowest number of hits, wins.
Target Hitting
Purpose: This drill is great for hitters of all ages. It is designed to help players develop bat control, and understand how to hit balls in different locations of the strike zone.
Set up: Drill is done on a batting tee. You will also need a screen or other object to be used to hang a target. Use some athletic tape to tape an “X” about 5 feet high.
How it works: There are 3 different rounds during this drill: middle pitch, outside pitch, and inside pitch. Coaches will set the tee up for the middle pitch at the middle of the plate. The tee should be slightly out in front of the hitter’s front foot to start, and about even with the foot after he takes his stride. The target will be set up about 15 feet away, right down the middle of the cage or field. Hitters are trying to hit the “X.” The distance and height of the target will cause the players to subconsciously adjust each swing toward hitting line drives.
When setting up the outside pitch, move the screen about 5 feet to the opposite field side of the cage. Tee should be set up on the outside corner of the plate, and moved back slightly, so that the stride foot now lands an inch or two past it.
When setting up the inside pitch, move the screen about 5 feet to the pull field side of the cage. Tee should be set up on the inside corner of the plate, and moved forward slightly, so that the stride foot now lands an inch or two behind it.
Distance Hit
Purpose: This drill is designed to get young players to begin learning how to hit the ball hard. Removing all mechanical thoughts, and focusing on hitting the ball as far as possible is a simple, and natural way for young hitters to learn and develop bat speed and power. This drill is especially great for tee ball age players and for parents working at-home with beginners.
Set up: Players should be nice and loose. Have them take some warm up swings before they begin the drill. This can be a competition or done individually. Set up a batting tee in an area where players can hit the ball as far as they can, without obstacles in the way to stop it.
How it works: Just as the name implies, players will be trying to hit the ball as far as they can. A coach or another player will be standing out in the field to act as a marker. The player will hit the ball as far as he can off of the batting tee. When it stops, the marker coach will go stand where it landed. Give the player 3 attempts, and leave a cone or other type of marker on his farthest throw. The winner will be the player who’s marker is the farthest from the starting line. If done as an individual drill, have players write down where their farthest hit landed, so that they can try to top their best distance the next time you do the drill.
Over-sized Ball Soft Toss
Purpose: This drill is for players who have trouble making contact with the baseball when hitting. The drill will help them develop hand-eye coordination with the bat, as well as develop confidence in their hitting ability.
Set up: All you need is some type of over-sized ball that can be hit. You can use the cheap rubber balls that you can find at department stores, or even a beach ball style ball. If the ball is hard enough that it will hurt to get hit with, you’ll also want an L-screen to stand behind.
How it works: Standing about 12-15 feet away from the hitter, flip the ball underhand to them and let them hit it. The added size of the ball will make contact easier, and help them develop the feel of hitting the ball.


